
Top Tools for Finishing Concrete on a Shoestring
When finishing concrete on a shoestring, you'll need the right tools to achieve a professional-looking result. Start with essential edging tools like concrete edging trowels and floats, which provide clean, defined edges and prevent water seepage. Budget-friendly tamping options include hand tampers, plate compactors, and DIY solutions. Invest in a finishing float, selecting from resin, aluminum, or magnesium materials based on your project's size and needs. You'll also need a finishing trowel, scraper, and concrete brush, which can be substituted or DIY'd to save costs. By investing in these must-haves and getting creative with DIY solutions, you'll be well on your way to a polished finish without breaking the bank, and there's more to discover to take your concrete finishing skills to the next level.
Key Takeaways
• Hand tampers, plate compactors, and rake and shovel combos are budget-friendly tamping options for small to medium-sized projects.
• DIY smoothing tools can be created from wooden/plastic rulers, old credit cards, and PVC pipes to achieve professional-looking results.
• Edging trowels and floats are essential for clean, defined edges and preventing water seepage, and investing in quality tools leads to long-lasting projects.
• Finishing floats made of resin, aluminum, or magnesium are necessary for smooth finishes and preventing air pockets, and regular cleaning is recommended for maintenance.
• Combination of handheld and long-handle scrapers, with high-carbon steel or stainless steel blades, are cost-effective solutions for various tasks and environments.
Essential Edging Tools for Beginners
When finishing concrete, you'll need to create a clean, defined edge, and that's where vital edging tools come in, helping you achieve a professional-looking result.
As a beginner, it's easy to overlook the importance of proper edging techniques, but trust us, it's significant. Without the right tools, you'll end up with uneven, sloppy edges that can ruin the entire project.
To avoid common beginner mistakes, invest in a quality edger, such as a concrete edging trowel or an edging float. These tools will help you create a smooth, defined edge that sets your project apart. Remember, edging isn't just about aesthetics; it also helps to prevent water from seeping under the concrete, which can cause damage over time.
Mastering edging techniques takes practice, but with the right tools and a bit of patience, you'll be achieving professional-looking results in no time.
Don't be tempted to skip this step or use inferior tools – it's worth the extra effort to get it right. By incorporating vital edging tools into your concrete finishing routine, you'll be well on your way to creating beautiful, long-lasting concrete projects.
Budget-Friendly Tamping Options
Get ready to compact your concrete with confidence, as we plunge into budget-friendly tamping options that won't break the bank. You'll be surprised at how effective these affordable tools can be in achieving a smooth, even finish. When it comes to tamping techniques, you don't need to spend a fortune to get the job done.
Here are some budget-friendly tamping options to evaluate:
-
Hand tampers: These manual tools are perfect for small to medium-sized projects. Made from budget materials like wood or aluminum, they're lightweight and easy to use.
-
Plate compactors: For larger projects, plate compactors are a cost-effective alternative to rollers. They're great for compacting concrete in tight spaces and can be rented or bought at a lower cost.
-
Rake and shovel combo: This DIY approach involves using a rake to spread and smooth the concrete, followed by a shovel to compact it. It may take some elbow grease, but it's a zero-cost solution.
- Homemade tampers: Get creative and make your own tamper using a wooden handle and a metal plate. It may not be the most durable option, but it's a budget-friendly solution in a pinch.
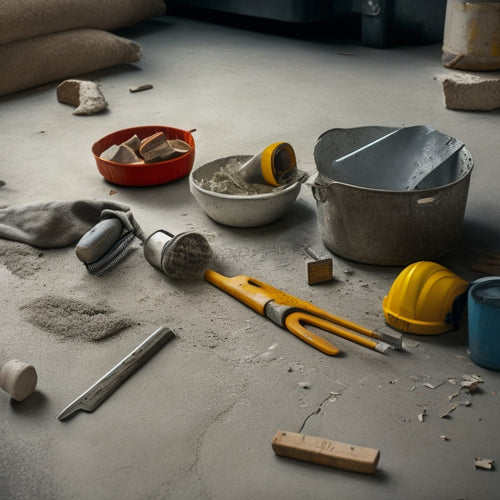
Must-Have Concrete Floats
You'll want to invest in a few essential concrete floats to achieve a smooth, even finish and prevent air pockets from forming in your freshly poured concrete. When choosing a float, consider the material: resin, aluminum, or magnesium.
Resin floats are lightweight and easy to clean, while aluminum floats are durable and resistant to warping. Magnesium floats, on the other hand, provide a smooth finish and are ideal for large areas.
When it comes to float maintenance tips, regular cleaning is key. Remove any concrete residue with a wire brush and mild detergent. Store your floats in a dry place to prevent rust or corrosion.
It's also essential to inspect your floats regularly for damage or wear and tear, replacing them as needed.
In terms of float material comparison, resin floats are ideal for small to medium-sized projects, while aluminum and magnesium floats are better suited for larger areas.
Regardless of the material, a high-quality float is an investment worth making to achieve a professional-looking finish. By choosing the right float for your project and following proper maintenance tips, you'll be well on your way to a smooth, even finish.
Affordable Finishing Trowels
When it comes to affordable finishing trowels, you'll want to focus on two key aspects: selecting the right size for your project and handling groove patterns effectively.
You'll need to reflect on the size of your concrete surface and the type of finish you're aiming for to choose the perfect trowel size.
Selecting the Right Size
Choose a finishing trowel that's proportionate to the size of your concrete project, as a trowel that's too small will slow you down and one that's too large will be unwieldy. When selecting the right size, evaluate the concrete slab dimensions and finishing area considerations. A trowel that's too big for the job may be difficult to maneuver, while one that's too small may require more strokes, increasing the risk of imperfections.
Here are some key factors to evaluate when selecting the right size finishing trowel:
-
Project size: Larger projects require larger trowels to cover more ground efficiently.
-
Concrete thickness: Thicker concrete slabs may require a larger trowel to apply sufficient pressure.
-
Finishing style: If you're aiming for a high-gloss finish, a smaller trowel may be more suitable for detailed work.
- Personal comfort: Choose a trowel that feels comfortable in your hand, allowing you to work efficiently without fatigue.
Handling Groove Patterns
How do you achieve consistent groove patterns with an affordable finishing trowel, guaranteeing a professional-looking finish without breaking the bank?
It all starts with selecting the right trowel for the job. Look for one with adjustable handles and interchangeable blades, which will give you more flexibility and control over your groove pattern techniques.
When it comes to creating decorative groove options, experiment with different blade angles and pressures to achieve the desired effect. For example, a steeper blade angle can produce deeper, more dramatic grooves, while a shallower angle will result in more subtle, textured patterns.
To guarantee consistency, work in small sections, using a level to keep your trowel straight and a string line to guide your strokes. Apply gentle to moderate pressure, depending on the type of concrete and desired pattern.
Remember to keep your trowel clean and well-lubricated to prevent sticking and unevenness. By mastering these techniques and using the right affordable finishing trowel, you can achieve professional-looking groove patterns without breaking the bank.
Cheap Yet Effective Scrapers
When it comes to scraping and removing excess concrete, you'll want to contemplate the right tool for the job.
You'll likely need a combination of handheld and long-handle scrapers to tackle different areas of your project.
Handheld Scraper Options
By investing in a few essential handheld scraper options, you'll be well-equipped to tackle a variety of concrete finishing tasks efficiently and effectively. These compact tools are perfect for reaching tight spaces, removing excess concrete, and smoothing out surfaces.
When selecting a handheld scraper, look for ergonomic handle designs that fit comfortably in your hand, reducing fatigue and improving control.
Here are some key features to take into account:
-
Blade material: Choose scrapers with high-carbon steel or stainless steel blades for durability and rust resistance.
-
Blade angle: Select scrapers with adjustable blade angles to adapt to different concrete textures and surface types.
-
Grip type: Opt for scrapers with rubber or foam grips for improved traction and reduced slippage.
- Maintenance access: Think about scrapers with easy-disassembly designs for convenient cleaning and maintenance.
Remember to follow scraper maintenance tips, such as regularly cleaning and lubricating your tools, to extend their lifespan and guarantee peak performance.
Long-Handle Scraper Uses
You can supplement your handheld scraper collection with long-handle scraper options that offer extended reach and leverage, making them ideal for scraping and smoothing large concrete surfaces.
One of the primary long handle scraper advantages is that they allow you to cover more area with less fatigue. This is especially useful when working on large concrete slabs or floors.
When using a long-handle scraper, it's crucial to master the proper techniques to get the most out of your tool. Start by holding the scraper at a 20- to 30-degree angle, with the blade almost parallel to the surface. Then, apply gentle to moderate pressure, depending on the surface's roughness, and pull the scraper towards you in smooth, even strokes.
This long handle scraper technique helps to remove excess material and achieve a smooth finish. By combining these techniques with the right scraper blade, you'll be able to efficiently scrape and smooth large concrete surfaces, all while saving your back and knees from excessive strain.
Scraper Blade Materials
Concrete scraper blades made from high-carbon steel or stainless steel prove to be cost-effective options that still deliver reliable performance on the job site.
You'll find these materials in many scraper blade types, offering a balance between durability and affordability. High-carbon steel blades are particularly suitable for scraping and removing thin layers of concrete, while stainless steel blades excel in harsher environments where corrosion resistance is essential.
When selecting a scraper blade, consider the following factors to guarantee you get the most out of your tool:
-
Blade thickness: Thicker blades (1/4 inch or more) provide extra strength for heavy-duty scraping, while thinner blades (1/8 inch or less) are better suited for finer finishes.
-
Edge type: Straight-edged blades are ideal for scraping large areas, while curved or angled edges are better for getting into tight spaces or corners.
-
Coating: Look for blades with a durable coating, such as chrome or titanium, to reduce wear and tear.
- Maintenance: Regularly clean and sharpen your scraper blade to maintain its effectiveness and extend its lifespan.
DIY Concrete Smoothening Tools
Finishing trowels and edgers are the go-to tools for achieving a smooth, even finish on your DIY concrete project. However, you don't need to break the bank to get professional-looking results. With some creativity and resourcefulness, you can create your own DIY concrete smoothening tools.
One DIY smoothing technique is to use a homemade smoothing tool made from a wooden or plastic ruler attached to a handle. This makeshift trowel can help you achieve a smooth finish, especially in small areas.
You can also repurpose an old credit card or a similar flexible plastic sheet as a makeshift edger to remove excess concrete and create a clean edge.
Another option is to use a piece of PVC pipe as a homemade edger. Simply attach a handle to the pipe and use it to smooth out the concrete.
Economical Concrete Finishing Brushes
After crafting your own DIY smoothening tools, it's time to turn your attention to another cost-effective solution: using economical concrete finishing brushes to add texture and pattern to your freshly poured slab.
These brushes are designed to create various finishes, from rough to smooth, and can be used to achieve different textures and patterns.
When selecting an economical concrete finishing brush, consider the following:
-
Natural Bristle Brushes: Ideal for creating a rough, textured finish. Look for brands like Purdy or Wooster for high-quality natural bristle brushes at an affordable price.
-
Synthetic Bristle Brushes: Suitable for smooth finishes and can be used with a variety of concrete mixes. Try brands like Marshalltown or Bon Tool for reliable synthetic bristle brushes.
-
Stencil Brushes: Perfect for creating intricate patterns and designs. Brands like Kraft Tool or Goldblatt offer stencil brushes at an economical price point.
- Extension Pole Brushes: Great for reaching large areas without straining your back. Look for brands like Zinser or Sashco for durable extension pole brushes.
Low-Cost Joint Cutting Tools
Cutting joints in your freshly poured slab is an essential step in preventing cracks and guaranteeing a durable finish. You can do it efficiently with low-cost joint cutting tools.
When it comes to joint cutting techniques, you don't need to break the bank to get the job done. Budget joint saws, for instance, can be just as effective as their high-end counterparts. Look for saws with durable blades and adjustable handles to guarantee precise control.
You can also opt for manual joint cutters, which are often more affordable and suitable for smaller projects. These tools typically feature a flat, toothed blade that you push or pull to create the joint.
When choosing a low-cost joint cutting tool, consider the type of concrete you're working with, the size of your project, and the level of precision you need. By selecting the right tool for your job, you can achieve professional-looking results without blowing your budget.
With the right technique and tool, you'll be able to create clean, precise joints that enhance the overall appearance of your concrete finish.
Best Budget Concrete Rakes
When you're on the hunt for a budget-friendly concrete rake, you'll quickly realize that not all options are created equal.
You'll want to contemplate the type of material used for the rake blade, as it can affect the tool's durability and performance.
Additionally, you'll need to think about the handle options and the range of sizes available to guarantee you get a rake that fits your specific needs and preferences.
Rake Blade Materials Matter
What makes a budget concrete rake stand out from the rest is the material used in its blade, which can greatly impact the quality of your finished concrete.
When it comes to rake blade materials, you'll typically find four common types:
-
Carbon Steel: A popular choice for budget rakes, carbon steel blades are durable and resistant to corrosion. They're suitable for most concrete finishing tasks, but may require more maintenance than other materials.
-
Stainless Steel: Stainless steel blades offer superior corrosion resistance and are ideal for working with high-moisture or salt-based concrete mixes. They're also easier to clean and maintain than carbon steel blades.
-
Aluminum: Aluminum blades are lightweight and corrosion-resistant, making them perfect for working with lightweight concrete mixes or in areas with high humidity. However, they may be less durable than steel blades.
- Fiberglass: Fiberglass blades are extremely durable and resistant to corrosion, but may be more expensive than other options. They're ideal for working with high-strength concrete mixes or in extreme weather conditions.
When choosing a budget concrete rake, consider the type of concrete you'll be working with and the level of durability you need.
Concrete Rake Handle Options
You'll find that the handle of your budget concrete rake is just as important as the blade, as it affects your comfort, control, and overall performance during long days of concrete finishing. A good handle can make all the difference in reducing fatigue and improving your overall finishing results.
When it comes to rake handle materials, you've got a few options to evaluate:
| Material | Pros | Cons |
|---|---|---|
| Fiberglass | Lightweight, durable, and resistant to corrosion | May be prone to splintering |
| Aluminum | Strong, corrosion-resistant, and adjustable | Can be heavy and expensive |
| Wood | Traditional, comfortable, and affordable | Susceptible to rot and damage from the elements |
| Composite | Strong, durable, and resistant to corrosion and rot | May be expensive and heavy |
Adjustable rake handles are also worth examining, as they allow you to customize the length and angle of your rake to suit your needs. This can be especially useful if you're working on uneven or hard-to-reach areas. By choosing the right rake handle material and design, you can optimize your concrete finishing performance and get the job done efficiently.
Budget Rake Size Variety
Concrete finishing projects often require a range of rake sizes to tackle different areas and tasks, and budget rake options typically offer a variety of sizes to suit your needs. When choosing a budget rake, you'll want to take into account the specific tasks at hand and select a rake that's up to the job.
Here are a few budget rake size options to take into account:
-
12-inch rakes: Ideal for smaller areas, such as countertops or patchwork repairs.
-
24-inch rakes: Suitable for larger areas, like floors or driveways.
-
36-inch rakes: Perfect for big commercial projects or large residential jobs.
- 48-inch rakes: Great for massive industrial projects or large-scale renovations.
When selecting a rake size, remember to also take into account the material it's made of. Aluminum and steel rakes are durable and resistant to wear, but may require more maintenance than fiberglass or plastic options.
Regular cleaning and storage can help extend the life of your rake, regardless of the material. By choosing the right rake size and material for your project, you'll be well on your way to achieving a professional finish without breaking the bank.
Cost-Effective Curing Compound Tools
Five crucial tools help you apply curing compounds efficiently and cost-effectively to your freshly poured concrete. You'll need these tools to guarantee a strong, durable finish.
When it comes to curing compound types, you have options. Acrylic, wax-based, and silicon-based compounds each have their own strengths and weaknesses. Acrylic compounds are great for outdoor projects, while wax-based compounds are better suited for indoor applications. Silicon-based compounds offer excellent UV resistance.
To get the most out of your curing compound, it's vital to master application techniques. Here are some tools you'll need:
| Tool | Description | Purpose |
|---|---|---|
| Sprayer | Adjustable nozzle, 3-5 gallon capacity | Even application, coverage of large areas |
| Roller Extension Pole | 4-6 foot extension, microfiber roller cover | Efficient application, reduced fatigue |
| Squeegee | Rubber blade, 12-18 inch width | Removing excess compound, smooth finish |
| Brush | Natural bristle, 2-4 inch width | Edge work, tight spaces |
Frequently Asked Questions
Can I Use a Regular Broom to Finish Concrete Surfaces?
You can use a regular broom to finish concrete surfaces, but it's essential to master broom techniques to achieve the desired surface texture; experiment with different broom angles and pressures to get the texture you want.
How Do I Prevent Concrete From Sticking to My Tools?
To prevent concrete from sticking to your tools, you'll want to use a concrete release or apply tool coatings like oil, wax, or silicone to create a barrier, ensuring a smooth finish and easy cleanup.
What Is the Ideal Temperature for Finishing Concrete?
"When you're in the sweet spot, you'll find that ideal conditions for finishing concrete occur between 50°F and 70°F, as temperature effects can make or break the final product, so keep an eye on the thermometer."
Can I Finish Concrete in Direct Sunlight or Rain?
You should avoid finishing concrete in direct sunlight or rain, as it can hinder concrete curing and lead to uneven surfaces, cracks, or discoloration due to weather effects, making it difficult to achieve a smooth finish.
How Often Should I Clean and Maintain My Concrete Tools?
'Don't you want your concrete tools to last? Clean them after every use and establish a regular maintenance schedule to extend tool lifespan and guarantee peak performance - it's worth the extra effort!'
Conclusion
You've made it to the finishing line!
With these top tools for finishing concrete on a shoestring, you can achieve professional-looking results without breaking the bank.
From edging to curing, we've taken care of you.
Think of your concrete project as a canvas, and these tools as your masterful brushstrokes – with the right techniques, you'll create a work of art that's both functional and beautiful.
Now, get out there and start finishing like a pro!
Related Posts
-
Top 10 Concrete Repair Tools for Small Fixes
You'll need the right tools to tackle small concrete repairs efficiently and effectively. When it comes to small fixe...
-
5 Tips for Accurate Concrete Measurement Tools
To guarantee accurate concrete measurement, you'll want to calibrate your measuring tools regularly, choosing a frequ...
-
What Tools Are Needed for Concrete Wall Foundations
You'll need a thorough array of tools and equipment to construct a concrete wall foundation that meets structural int...


